Wednesday, 22 August 2018

Using your Rotary Cutter - The Basics

I would like to think that my quilt patterns can certainly be achieved by the beginner quilter. They have large pieces for the background which are very forgiving for cutting and then piecing accurately.

So I thought in order to encourage the beginner quilter I would make a video to show how you use your rotary cutter to cut strips. Yes there are lots of ways to cut your fabric this happens to be my way and I hope it helps on your quilting journey.


Happy Creating

Sunday, 15 July 2018

my urban bag - pattern hack

When I have bought patterns, I like to be able to use them more than once... And I like to be able to do the same thing with my own designs. So with my urban bag pattern I would like to show you some of the pattern hacks I have done.

The original urban bag pattern is a cute little purse that I use all the time as my everyday purse. I have made multiple versions of this pattern. The finished size is 6 1/2" x 3 1/2" without the strap. I have also just added this pattern to my website as a PDF download... so you can print at home... Yay!

My current urban bag I am using, made out of beautiful Amy Butler Fabric.

But my mum asked me to make her a little change purse... I have made her change purses for a very long time! he he... So I took my Urban Bag main fabric template and went to the photocopier and recopied the template to 85% of the original size. (decreasing the size of the bag) I then used my quilting ruler and marked a half inch line inside the main fabric template to make the template for the Peltex 71F interfacing. I then made followed  the steps of the pattern, omitting the strap. This includes Step 12, for the corners, they will remain at 3/4" from each corner. Finish pattern as described.

The end result? A cute little purse 5 1/2" x 2 3/4" and 1 3/4" wide.

Little change purses.... mmm... love the Cotton & Steel Fabric.

My second pattern hack was a request from my 15 year old daughter, she asked if I could make her a pencil case for school! Okay I was a bit excited for her to ask me to make her something for school, you know what teenagers are like! So this time, I took my Urban Bag main fabric template and went to the photocopier and recopied the template to 160% of the original size. (increasing the size of the bag)  I then used my quilting ruler and marked a half inch line inside the main fabric template to make the template for the Peltex 71F interfacing.

I made a couple of small additions for the bigger size. The main one was that I made zipper tabs on each end of the zipper. This makes the zipper sit really nice, especially for the bigger size, this is important.

So at Step One when cutting out the fabric, also cut out 2 x 2 inch square pieces of your main fabric, these are your zipper tabs. Take one of these pieces and with wrong sides together, fold in half and iron. Open out and fold the raw edges towards the center crease. Repeat with the other zipper tab. For this pattern hack, you will need at least a 12 inch (25cm) zipper, I used a chunky zip.


Take your zipper and trim the end, where the zipper pull ends close to the metal zipper stops. Then measure from those stops, 10" and mark. Trim this end. You will now have a ten inch zip.


Place one end of the zipper inside one of the pressed zipper tabs and pin. The zipper tabs will be wider than than the zipper but it will be trimmed. Using your sewing machine, top stitch the zipper tab closed. Repeat for the other end. Trim edges of the zipper tabs even with the zip.


Zipper with zipper tabs done! Going back to the Urban Bag pattern, Step Three, When placing the zipper you will centre the zipper along the top edge as described. You should have at least 1/2" on either side of the zipper.


Continue on with pattern until Step 12, making the corners, I used 2" for my measurement from the corner instead of 3/4". Finish pattern as described.


This makes a great size pencil case... Finished size, 10 1/2" x 5 1/2" and 4" wide, and yes my daughter loves it!


Have fun with these pattern hacks. I would love to see what your making.

Happy Creating!


Tuesday, 26 June 2018

Joining Batting with your Sewing Machine


For your viewing pleasure.... How I sew to pieces of batting together...

Happy Sewing

Tuesday, 20 February 2018

Quilt Basting - using Quilt Basting Spray = no more puckers!

There is nothing worse than when you have pinned and stretched your quilt and when you have finished sewing it and turn your quilt over there are puckers underneath... I absolutely hate that...

So a number of years ago I was taught how to use quilt basting spray to spray baste my quilts.... And I have been  pucker free since... Yay!!

So I have made a short video on how I use it.... Yes there are a lot of ways to use it and a lot of different sprays out there... I only use Helmar 101 as I get the best results... This is now the only method I use for basting my quilt for using a sit down machine...


Happy Sewing


Friday, 26 January 2018

It’s a new year... Lets make 2018 a GREAT one!

Well, January is certainly underway... actually its nearly over!..... and I have been trying to get myself organised for 2018...

So of course a time for some reflection for 2017... for my beautiful family it has been a very up and down year... My husband unexpectedly lost his beautiful mum and he also had to have a number of surgeries... that obviously takes a toll on the whole family... so in that regards we were certainly happy to see then end of 2017........  we did have happy times , a great family camping trip to Fraser Island, a trip to Bali with some wonderful sewing friends.... Oh and I also turned 50...... Yay!


I then thought about my own personal / work goals for 2017...... I honestly felt it had been a very unproductive year... But then I found some goals that I had written out for the end of 2017.... yes using my printables....... and I was pleasantly surprised... I actually achieved most of them.... I started teaching workshops using my own patterns.... (I have previously taught sewing but it was for the wonderful patchwork shop I was working for) and I loved it... I grew my graphic / web design part of my business... yay and personally I have worked on being healthier and consistently riding my horse up to the point that I entered my first horse trial event and completed it... Woo hoo!


So now its 2018, last year I designed some printables for making goals and breaking that down for lists for the week and months.... I don't know about you but I love a list and it helps me a lot to keep on track.... I have attached my printables that I designed with a few updates... the main one being my projects at a glance... Click HERE to download your own printables.


I have filled out my project list so I know exactly what needs to be finished and yes I have written down my new yearly goals for both my business and personal life..... lets see how we go... Let’s make 2018 a great one!

Happy Sewing,
 

Saturday, 31 December 2016

I do like a list! .... with free 2017 planner printables

I'll confess I love lists.... I use them for everything... So as 2017 is just about to begin I designed some planners to help me.... And I thought you might like them too.

My first thing I like to keep track of is; What is coming up during the year... So I designed a "Year at a Glance" planner. This allows me to see what I am doing and some important dates.


The next thing I wanted to plan is my week.... I find that if on Monday morning I plan what I need to do, including work and home commitments I am much better organised. I even have a section for emails; txts and calls I need to make.... I don't know about you my memory gets exhausted and I am always forgetting things... I have been writing these things down in a diary over the past year which has really helped .... but sometimes I need just a bit more room...


Finally, I am always thinking of new things I want to make .... again I needed a list so I didn't forget my ideas... So I can write them down easily and keep them in one place! This includes not only sewing ideas but craft, graphic design and gardening ideas.


I have printed them out and a put them in a display folder with plastic sleeves. A little more up market one than your normal one... But it makes my lists easy to get to and write on... 

Here is a link to my website where you can click on the free 2017 planner printable to download for free... 

So I hope this helps my year start being super organised and I hope you like them to.... 2017 is going to be great one!

Happy Creating.

Monday, 17 October 2016

Colour Inspiration

Bromeliads are one of the easiest plants to grow... And I love the fact that they can come in some awesome colors. Here are some of mine which have flowered.

 Happy Creating.

Thursday, 15 September 2016

One of my favourite quilts - My Flower Bloom Quilt


I absolutely love this quilt when I finished it... Is it the texture of the background or the pop of  colour of the flower blooms? I do not know ..... I think it just works!


The background is made of large 60 degree triangles, in white, cream, grey and silver. And grey is not a colour I would normally pick, but I do love a bit of sparkle... I do not match whites and cream and I do not think about a warm or cool grey. I just do not match....

I often get asked how do I pick my background fabrics... The trick for me is to lay your fabrics out and squint your eyes, if one pops out, then it doesn't work... take it out. The background needs to be full of texture, you could even use linens and thicker weight fabric, it is about the texture of the background.

For the flower bloom fabrics, I used one of my favourite designers, the Kaffe Collective... But I did not pick the super brights, I picked the medium ones... Here they are...


The flower blooms have been raw edge appliqued and faux trapuntoed. Have you ever done this technique? It is one of my favourites. You could use this technique on all your applique pieces like this quilt or use small parts of your quilt trapuntoed. The trapunto gives your applique pieces a little bit of "puff', but more subtle than traditional trapunto and there is no cutting or stuffing.


Here is what the trapunto looks like... This technique makes the flower blooms pop off the quilt!

The Flower Bloom Quilt patterns for this is is full colour instructions and goes step by step on how to complete the quilt including the trapunto.

The templates for the flower  bloom are also full sized, so there is no need for enlarging.


If you wish to purchase a flower bloom quilt pattern click here... or if you just wish to learn some of my machine applique techniques, including the trapunto then I have a great little booklet of tips and techniques called... my machine applique..

I hope you love this quilt as much as I do..

Happy Creating


Monday, 29 February 2016

I'm loving Knit Fabric

Do you love to wear knit fabric but get a bit nervous sewing it? Well me too!..... As you would know last year I launched 3 new clothes patterns... and yes I love making them in beautiful woven cotton quilting fabric.... But now there are some amazing knit fabrics also being made.... so yep I made my clothes in knits.... and what do you know.... I LOVE THEM.... so here are are tips and tricks for my clothes patterns.... You sooo have to try them!

Basic How To for sewing with knit fabrics.
* Use a 90 ballpoint machine needle (stretch needle)
* Use a stretch stitch on your sewing machine... it often looks like a lightening bolt.
* Use clear elastic tape to sew in the shoulder and side seams.
* Use knit hemming tape in the hems.... this stops the hems stretching and making a wavy edge.

* If in doubt purchase the Colette Guide to Sewing Knits Book its a great reference book for sewing knit fabric.


PS066 My Fit and Flare Dress
* Cut a size smaller for your knit fabric
* Keep the back neck darts
* Do not sew the back contour darts
* I did not add the zipper... I sewed a full back seam
* When sewing the side and shoulder seams use clear elastic tape and stretch stitch.
* Use stretch hemming tape when sewing the hem
* Use bias binding for the neck and shoulder edges as per the pattern.

I made mine in Girl Charlee fabric Cotton Jersey blend knit called Pure Vintage Lotus Flower


PS070 My Shift Dress
* Cut a size smaller for your knit fabric
* Keep the back contour darts
* I did not add the zipper... I sewed a full back seam
* When sewing the side and shoulder seams use clear elastic tape and stretch stitch.
* Use stretch hemming tape when sewing the hem and sleeve edges
* use bias binding for the neck edge as per the pattern.

I made mine in Girl Charlee fabric Cotton Jersey blend knit called Vintage Blue Stitched Arrow


PS065 My A-Line Skirt
For the A-Line Skirt I only made the skirt in knit fabric.
* Cut the same size pattern pieces as woven. 
* Cut the yoke in woven fabric
* Cut the skirt pieces in knit fabric
* Make the same as per instructions for the woven skirt.
* Use stretch hemming tape when sewing the hem edge to prevent it from stretching
* use bias binding for the yoke waist edge as per the pattern.

I made mine in Anna Maria Horner fabric Cotton Jersey blend knit called Sealing Wax knit in Primary


Make sure you have a go and making them.... If you do not own one of my Passionately Sewn Clothes Patterns head over to my website

Happy Creating
Janeene


Thursday, 28 January 2016

You need this great photo app! SuperPhoto .... It's awesome!

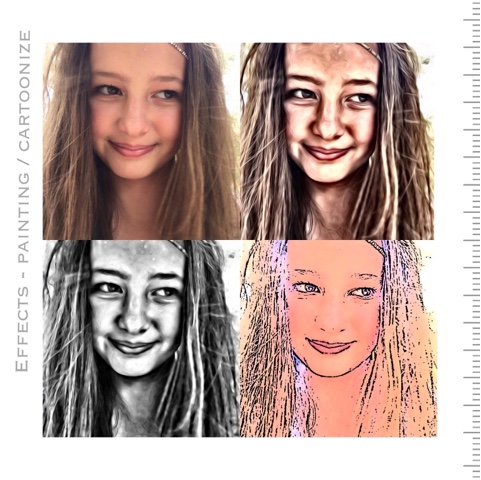
 Whilst I love sewing I just LOVE anything creative... This also extends to my computer. So here is a little app I have found... Thanks to my brother in law 😁..... And it is ridiculously cool, easy to use and it's free! It's called... Drum roll... SuperPhoto


You simply upload a photo from your gallery/library and play with the awesome effects. Yes it works on both apple and android gadgets . 

Here are some photos I have used and effects. You will see that the painting effect and cartoonize is my favourite. It works great for portraits, pics of your quilts and even your colouring (well my beautiful daughters) 

Hope you love playing with it... 

Happy creating 
Janeene xxx


Monday, 18 January 2016

Sew a love heart cushion for your Valentine.... oh and FREE postage

In our family we call Valentines Day... Love Day... its about our family... we don't do cards or bought gifts but we might make a special gift or even a yummy Chocolate cake for all to share!

Do you want to make something special for your Valentine? Here are some great options.... I have designed some beautiful applique cushions that symbolise love! Head over to my passionately sewn website and enjoy free postage on all patterns until Valentines Day!

PS008 my love heart cushion
PS009 my lovebirds cushion

PS045 my singing love bird


Wednesday, 13 January 2016

Its been a very busy year - review of 2015

Well its been a very busy year of creation for my business as well as having some of the happiest family times. I am truly very lucky.

I started the year with creating two quilts for the kids issue of Quiltmania.. These were commissioned when I attended the 2014 Houston Fall Quilt Market. Let me tell you to create two quilts that have a specific request really tested by creative brain. This is not how I usually create.. But anywho I was very happy with the result... and yes one of them was on the front cover. Woo Hoo.

Part of my creative life includes working with Valerie Gautier from My Patch Fabrics. Val is not only is a great friend, I also help her out at various craft shows and of course she stocks my patterns.... so its always a great place if you want to see my quilts in the flesh ! 


So from these shows and talking to lots of wonderful sewers and quilters I published a little mini book... called My Machine Applique..It has lots of tips and tricks to get your machine applique to sing! I go through how to use zigzag, blanket stitch, decorative stitch and raw edge free motion applique. I have included some little sewing cards for showing needle pivoting placement which really helps if you are struggling with your machine applique. It also includes a free cushion pattern to practice your machine applique. 

In between all these things I also did a little bit of graphic design work for Paulines Quilters World and of My Patch Fabrics....... Whilst I love sewing, for me I love all things creative and this includes using the computer. Its a new skill I am learning and I love it. 

September was lucky me time and we all went on a family cruise with some great friends. It was time to relax and focus just on the family. There is nothing like having your passion being your business but you must remember your family. 


There is nothing like finishing your year off with going to Houston USA to attend the Fall International Quilt Market and the International Quilt Festival. And ... of course I put the pressure on by finishing five brand new quilts, 2 new bags and ..... tadah... 3 new clothes patterns. This was my second year at Quilt market and I really wanted to show that I wasn't a one show wonder. So lucky me .... mmmm apart from not having my patterns turn up until 2 hours before Quilt Festival.... I had two great shows with loads of wonderful opportunities. I met some wonderful people and lookout 2016! who knows what Ill be doing!


To finish off the year I have started to learn to ride a horse... properly! he he. I grew up riding a horse on our farm but didn't realise the techniques required to ride well. My daughter has been learning to ride for a number of years and I decided I also wanted to learn. From this I purchased my new horse Jordie to do this... I had my first lesson just before Christmas and let me tell you I used muscles in my legs I didn't think existed.. he he.. 
So this year will see both my daughter and I compete in our first dressage competition. 


Finally a wonderful Christmas with all our family... we only have a small one but we don't get together too often. We had a wonderful day with everyone at home.. And of course we had a magic moment of seeing a rainbow around the sun! Have you ever see one? 


What a great way to end 2015.... 
Lookout 2016 here I come!